Wednesday, 6 April 2016

Polymorphic extension methods

The title is an exaggeration in some ways, but in the way the final code reads you would think it is exactly what we have.

Let me set the scene for the problem. I have a problem where I am writing a client library that will be used to call a web service. The web service will return an enumerable collection of objects. These objects will all derive from a common base type (we'll call it BaseType for want of a anything less descriptive) and each type will need to be processed in a different way. I know that the web service will return only three types at the time I write the client library, but in the future more types will be introduced.

The client library will be used by a large number of applications, so to reduce the need to redeploy these applications when the extra types are introduced, the library must be able to dynamically extend its type handling capabilities.

My first thoughts went straight to a loop through the collection, calling a method on each item to handle that item. Basic polymorphism. However, to do this the base type must expose the method and each derived type override it, neither of which I the case.

Next I thought about extension methods. The loop would look the same

 public void HandleValues(IEnumerable<BaseType> values)  
 {  
   foreach (var item in values)  
   {  
     item.Handle();  
   }  
 }  

but the extension methods would differ based upon type.

 public static class ExtensionMethods  
 {   
   public static void Handle(this DerivedType1 item)  
   {  
     //do the work  
   }  
   
   public static void Handle(this DerivedType2 item)  
   {  
     //do the work  
   }  
 }  

This does not work however, the type of item in the loop is BaseType, so no extension method is found.

A big nasty if block or switch statement could be introduced to either cast the item or call the correct handler method. But this is not very extensible, and certainly doesn't satisfy the requirement to be able to extend the set of types that can be handled without cracking open the code, recompiling and redeploying.

That is when dependency injection patterns came to mind. The idea is that an extension method is created to extend BaseType which will dynamically select a handler and call it.

 public static void Handle(this BaseType item)  
 {  
   var handler = DIContainer.Instance.GetType<IHandler>(item.GetType().ToString());  
   handler.Handle(item);  
 }  

and the loop is unchanged

 public void HandleValues(IEnumerable<BaseType> values)  
 {  
   foreach (var item in values)  
   {  
     item.Handle();  
   }  
 }  

The container I chose was MEF, as it allows very simple plugin extension. I define the handlers I a class library,drop this into a folder and simply point the MEF container to that folder to load all handlers. If i want to handle a new type, simply create the handler in a new assembly, drop the assembly into the correct folder, and the next time the app starts it will have the handler.

To load the correct handler requires that each handler is attributed with the type it is to handle. Also, all handlers must either derive from a common type, or implement a common interface, I chose the second

 public interface IHandler  
 {  
   void Handle(BaseType item);  
 }  
   
 public interface IHandler<T>: IHandler where T:BaseType  
 {  
   void Handle(T item);  
 }  
   
 public abstract class BaseHandler<T> : IHandler<T> where T : BaseType  
 {  
   public void Handle(BaseType item)  
   {  
     Handle((T)item);  
   }  
   
   public abstract void Handle(T item);  
 }  

This takes things a little further, the generic interface IHandler<T> has a method that takes an object of the derived type,but this cannot be called directly as we only have an object reference by the BaseType.  As such I created a non generic interface with a method that takes a BaseType as it parameter, then I created an abstract BaseHandler class that implements both the generic andnon generic interfaces.  The implementation of the non generic method casts the item to the derived type,which it knows by virtue of its generic definition, then calls the generic method with the derived type instance. This approach allow me to create concrete handlers that dont need to performany casting and can deal directly with instances of the derived type they are designed to handle.

an example of a handler would be

 public class DerivedType1Handler : BaseHandler<DerivedType1>  
 {  
   public override void Handle(DerivedType1 item)  
   {  
     //do the work  
   }  
 }  

While I have chosen MEF to implement the dynamic loading of the handlers and the selection of these, any number of other DI containers could be used.  The use of MEF allows me to simply decorate the handlers with the type that they are to handle as their exported contract name:

 [Export(contractName:"MyNamespace.DerivedType1", contractType:typeof(IHandler)]  
 public class DerivedType1Handler : BaseHandler<DerivedType1>  
 {  
   public override void Handle(DerivedType1 item)  
   {  
     //do the work  
   }  
 }  

Saturday, 2 April 2016

Composition with MEF

I was working on a project recently where I was asked to write a nice standalone greenfield app.  I thought 'brilliant, I can do this the way I like.  Nice clean code, follow patterns I choose' etc,etc.  Only restrictions were that I should follow the corporate model for things like logging, storage access and the corporate line was that as few third party dependencies should be introduced as possible.

The application was a desktop app,so my choice was to use WPF, follow a MVVM pattern and obviously write the code following the SOLID principles.  Well here came the first challenge.  Dependency injection and inversion of control are things that were not practiced in the business that I was working in.  This mean that I needed to introduce the concept.  Eliminating 3rd party, and most specifically, open source technologies, I was left with a choice of MEF or possible Unity as my DI technology (or IOC container if you prefer to think of it that way).

Now whilst I had used Unity in the past, I had not fond it the easiest to work with, but with the restrictions listed above it left me with only MEF as an alternative.  Many moons ago I had investigated MEF,and I liked the concept, but at the time, having only used it in practice tutorials and never in a production system (we all remember the calculator example that was around when MEF first came to prominenece) I wasnt sure it was the best choice.  Despite my reservations, I was sat next to a MEF evangelist, and I was convinced it was the way to go.  Little did I know at that stage that it would prove an inspired choice.

Soon I came to my first real challenge that MEF came to rescue me from.  I mentioned above the corporate model for logging,this involved simply using a library written in-house that wraps log4net and adds some custom logic before logging.  The pattern adopted to perform this was to instantiate a static member in each class of the system to perform any logging required by that class:


The problem was that I didnt want to instantiate it directly in this way.  I wanted to compose each object using DI.  I wanted to be able to unit test all classes without the need for concrete implementations of the dependencies of the class.  That meant to me that I needed to only have dependencies of  class that were defined by an interface.  A simple contract between the objects.  Assumptions would be made in the unit tests that all logic external to the class under test was flawless, and as such could be mocked from the interface alone using any given mocking framework.

So the question was how do I do this when the logging library does not expose an interface, and furthermore the constructor of the logging class requires the type of the object that is to contain it.  The first thing to do was extract an interface from the logging class.  By luck there was in fact only one such class, so the extraction of an interface was very straightforward.  And the organisation had adopted a policy of creating nuget packages for any shared libraries used in the organisation, so use of this new library wold be adopted for any project undergoing development.

Next came the problem of injecting the logging object.  How could I inject an instance of the logger class to the constructor of an object and know the type of the object in advance to construct the logger?  I could configure my DI container with n logger instances, each constructed with a given type as its constructor argument for the n types I have in my system.  This seemed stupid and a maintenance nightmare.  I would need to change my DI container setup for each class I wrote.  I cold create a new constructor for the logger class, a default one, and pass the type in via a method or property.  But this wold involve the developer always remembering to perform this extra step of setting the type on the logger class. An unnecessary additional step that wold invariably be missed and lead to countless bugs.

In steps MEF with it great range of possibilities,  Not only does it allow you to inject objects via a constructor (or to a property, although I am not a fan of this.  I feel if a class needs another object, this should be clearly conveyed to the developer by appearing in the constructor argument list.  I prefer the external dependencies of my classes to be immutable.  Property injection to me seems to result in a class that will do something that is not at all clear to the developer, almost like the person writing the class wants to hide something.  As a side note it can be used to be round circular construction dependencies, but to me if you have such a circular dependency your design is wrong and you need to rethink your architecture at that low class level.),and back to my point, it allows you to inject anything to the constructor.  You can inject a simple value type.

You can inject a delegate, and that is where the solution to my problem came from.  I chose to inject a function that takes a type as a parameter and returns an object in the form of a reference to the new logging interface:


But how would I set up my MEF container to have such an entity (for want of a better term)?  WellI created a static class in the logging library that exports the function.  This wold be picked up by the population of the MEF container, and injected into any class the requires it.

This is nothing revolutionary in terms of how to construct an object.  It is simply the factory pattern, here the factory is the function.  But in terms of injecting an object that needs to know something about the target of the injection I feel it is very neat.  If you want to inject a different implementation of the function, you could, if you want to introduce a new implementation of the logging interface this would simply involve changing the factory function.  Clearly I have written this code in the simplest way,and to make it more extensible I might choose to pass more parameters to the factory function, which by changing it wold break any current use of it, however I don't foresee a need for this any time soon, and I believe in only building for what the requirements need now. I don't try to cater for every 'what if' that might rear up in the future as I could never think of them all, never mind code for them all.

Thursday, 24 March 2016

Writing quality code good for the soul

I recently found myself without paid employment. Not a great situation at first thought, but it actually turned out to be a blessing. Having been made redundant I was forced to think about what I really want to do.

I enjoy writing code and solving problems. Making things, you might say coding is my outlet for my creative side given my lack of artistic talent. The thing is I had spent years in the corporate machine, writing the code I was told to write, in the style I was told to, to do things that other people said it needed to do, the way they said it should do it. The lack of creative input was stifling. I wanted control. Don't we all. Without my own software house how could I do that? Well I couldn't. Not entirely, but I did have the power to only accept a job that felt right.

I know from experience that what you expect of a job from the advert and interview is seldom the reality. This left me with the quandary of how to choose a role that would fulfill my needs. I couldn't guarantee that I would choose a role that delivered what it promised in reality, so the best decision was to not tie myself to a single role long term. As a result I have become a contract software developer.

This leads me to my current role, one that on the face of it doesn't tick many of the boxes I was looking for. It's a role advertised as vb.net with vb6 developer, which after more investigation looked to be a job of migrating old applications that only run in Windows XP to work on Windows 8. Not a shiny sexy role, but a safe role. At the interview however things started to look better. Yes the legacy apps are vb.net (1.1 and 2.0) and vb6, but the technical vision was heading towards C# and .net 4.x. Also it was clear that the dev team, with the architect involved in the interview, had a good amount of control of the technical direction. It felt like the devs were valued as experts in their craft and opinions mattered.

Due to business reasons the technology was a little mired in the past, but the appetite to move forward was clear amongst the devs.

After a couple of months doing the necessary, taking a legacy app up to .net 4, and making the required changes to keep the app working in XP and now also in win8, I have the opportunity to work on a 'greenfield' project. It isn't a brand new app, rather a rewrite of an existing one, one that had bugs and required significant changes for the 'migration', so the decision to rewrite made sense.

I have been given almost full control of technical decisions for the app, as a result I am writing it using WPF, with a MVVM structure. The control of technical decisions has also allowed me to develop the code in a fully TDD manner, with near 100% unit test coverage using mocking through Moq to isolate classes for testing. The code I have written adheres to the SOLID principles to an extent no code I have written before did. The system is built up using dependency injection, and the code coupling is minimal. All in all its a pleasure to work with.

The thing I had in mind when I envisaged this post was that I now feel reinvigorated about coding. No longer is it a slog. When I add functionality, it goes in cleanly without making the existing code messy. When I refactor some sections I do it with confidence. I actually look forward to touching this codebase. It's amazing what clean code can mean, and I know better now than ever before why many clean coding evangelists preach so much about the pros of clean code. Its not just about a functional, maintainable system. Its about a functional, happy development team.

Monday, 13 July 2015

Managing your API

So you have developed a brilliant new web based API, the world will be fighting to get access to it, its the most useful thing ever.  But how do you manage access to it?  How do you protect it, how do you monitor calls to it, how do you restrict access based on who the consumer is?

Microsoft offer a solution to this as part of their Azure offering.  This blog will look at what Microsoft Azure's API Management product offers.

With APIM you can

  • Ensure access to the API is only via APIM
  • Set throttling policies based on users/groups
  • Make users sign-up for access
  • Generate and publish developer documentation easily
  • Monitor traffic
And probably a whole lot more that I have not explored yet.

And all this can be done for multiple APIs all through a single endpoint.  You simply need to have an azure account and create an APIM instance to get started.

I'll look at how to set up some of the things mentioned above, starting with establishing an APIM instance and pointing it to you already published API.

To create an APIM instance, go to the management portal for azure (I use the old style portal at https://manage.windowsazure.com/), select the APIM charm on the left


You will be presented with a list of your instances (but I guess you dont have any), and in the bottom left is the new button to create your first instance.  Clicking this will open a banner with the options of what you want to create, there are no options, so just click create in third column
You will be asked for a URL, this is the endpoint that the world will use to gain access to your API, and a few other questions about where the instance will be hosted, who you are and your contact details, and if you select the advanced settings you can select a pricing tier, but that as the name suggests is an advanced topic, and this is a basic intro blog, so leave the pricing tier as Developer for now.

After that it will go away and spin up an instance for you which will take some time.  At the end of this the list of APIM instances will be populated with a grand total of 1!!!

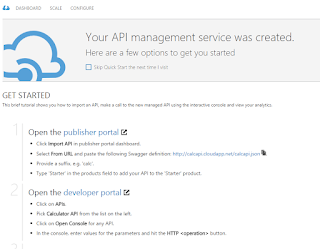
Next select the name of your new APIM instance and you will be presented with the quick start page, the only page that I honestly use within the azure portal in relation to the APIM instance.


The 'Publisher Portal' is the gateway to everything to do with the APIM instance.  And out of interest the 'Developer Portal' is what the public will see if you tell them where to look for information on you API, i.e. where you can provide documentation.

To finish setting up your vanilla first APIM instance, go into the publisher portal and you will be presented with a dashboard with not a lot of data
The next thing to do is connect APIM to you existing API, which you do by clicking the add API button, and providing the details required.  You need a name for the API, the URL for the API you made earllier, a suffix which will be used to distinguish between the APIs associated with the APIM instance and provide whether you want the access to the API (via APIM) to be allowed with or without TLS.

There are stil two steps to go. firstly defining the operations that can be accessed via the API.  I.e. what verbs are allowed and for what URLs.  Add operations such a GET users using the intuitive dialog
and finally you need to associate a product with the API.  Products are in my opinion badly named.  They represent levels of subscription to the API.  By default 2 products are preconfigured, Starter and Unlimited, you can associate these or any other products with the API using the Products tab on the right of the screen.

After this your new APIM is ready to go.

The next thing you may wish to do is add a throttling policy to the API (or more specifically the product).  You do this by selecting the policies option on the menu in the left, pick the combination of options you want to set the policy for (product, api and operation) and click the add policy option in the text box below. This will add a blank policy, and you can add the details of the policy using the code snippets on the right, so for a simple throttling policy select the limit call rate option, and this will add code to set a limit on the number of calls within a given time window.  By default the starter product is limited to 5 calls in any 60 seconds, and 100 calls in a week
This gives you a flavour of what can be controlled with this.

The use of the products and policies in conjunction allows you to fine grain the access to the API and its operations in a way that is best fitted to you and your users.

The next thing I would look at is securing your API so that the rules set up in APIM must be followed.  If people can go to the API directly, bypassing APIM, then these policies and rules are meaningless.

The simplest way to do this is to use mutual certificates between APIM and your API, and add code into your API to ensure that all requests have come from a source with that certificate.  This can be done by going to the security tab on the API section of the publisher portal
then pick the mutual certificates option in the drop down.  You will need to upload the certificate to the APIM instance, which can be done by clicking the manage certificates button.  In terms of ensuring the request has come from a trusted source, that is a coding question, but for completeness, within a c# MVC webAPI system, add a message handler to the pipeline for the incoming requests by editing the WebAPIConfig class

 public static class WebApiConfig  
 {  
      public static void Register(HttpConfiguration config)  
      {  
           // require client certificate on all calls  
           config.MessageHandlers.Add(new ClientCertificateMessageHandler());  
      }  
 }  
And then add a class to check the certificate:

 public class ClientCertificateMessageHandler : DelegatingHandler  
 {  
      protected override Task<HttpResponseMessage> SendAsync(HttpRequestMessage request, CancellationToken cancellationToken)  
      {  
           bool isValid = false;  
           X509Certificate2 cert = request.GetClientCertificate();  
           if (cert != null)  
           {  
                if (cert.Thumbprint.Equals(RoleEnvironment.GetConfigurationSettingValue("ClientCertThumbprint1"), StringComparison.InvariantCultureIgnoreCase)  
                 || cert.Thumbprint.Equals(RoleEnvironment.GetConfigurationSettingValue("ClientCertThumbprint2"), StringComparison.InvariantCultureIgnoreCase))  
                {  
                     isValid = true;  
                }  
           }  
           if (!isValid)  
           {  
                throw new HttpResponseException(request.CreateResponse(HttpStatusCode.Forbidden));  
           }  
           return base.SendAsync(request, cancellationToken);  
      }  
 }  
This allows you to define two certificate thumbprints in the web.config of the API to compare against the incoming request.  All requests via APIM will include the certificate that you upload in the publisher portal, so if you ensure that this cert is not made public, then you can be assured that all requests hitting the API have come through APIM.

I mentioned making users sign up for access.  Well if they want to use your API we have just ensured tha their requests must be directed via APIM.  The rest is built in.  The products that you configured earlier have associated with them a subscription key that the consumer of the API must supply with every request.  This ensures that every consumer of the API must have the subscription key.  The developer portal provides a way to subscribe to your APIM and thus get a key.  You can if you wanted restrict this so that you need to manually give access to every subscriber before they get a key, and that way you could monetize the access, but that is way beyond the scope of this article. Suffice to say they need to sign up to get the key or APIM will reject the requests.

The documentation aspect of APIM is probably something best explored yourself, I'm a techy and not best placed to explain this, however in summary you can document each operation on the page where the operation is created/configured, and the content of the description can take the form of html/javascript so you may wish to use some client side script to retrieve the documentation and manage the content externally.

 <div id="dynamicContent"></div>
<script src="https://myserver/scripts/documentation-ang.js"> </script>  
would call the javascript file which could provide the content required based on some data scraped from the rendered page.

The final thing to look at is the analysis of traffic.  Good news, you don't need to do a thing to configure this.  Basic analytics are provided out of the box.  If you require anything more complex than APIM offers for free you may wish to look at other products that could be bolted on to the system, but in general the data that is captured will provide you with a lot.

So in summary to that all, APIM offers an easy to set up and easy to configure interface to your API when you want to publish it to the world.  It gives easy access to some very good security features and access control.  There are many platforms out there that will host an API for you, but if you want to host you own somewhere, APIM offers a lot of what you need to consider before exposing your delicate little flower to the horror of the web.

Any questions or comments are welcome, and I will try to answer anything you ask.  And please share this with everyone you know, and even those you don't know.  Spread the word, the cloud is fluffy and nice!

Monday, 6 July 2015

Dedication, Motivation and Achieving

It has been said many times that to become an expert in anything you need to practice for 10,000 hours.  This theory has been professed for sporting prowess (see the book Bounce by Matthew Syed) and for technical skills (see John Sonmez's podcast) and many people argue against it.

I see the logic behind the idea, if you do something consistently for that long you will surely iron out a lot of the problems you have with it and become better.  You may not become the best, there may be some innate talent involved that you do not posses.  For sporting prowess, anatomically you may not be able to surpass some other people.  But practice anything for 10,000 hours and you will become a whole lot better than you are right now. One important point is that you probably do need some guidance (training) during these 10,000 hours, otherwise you may develop bad habits that will hold you back and will be difficult to break once they are deeply ingrained.

So coming to the technical skills of programming, Sonmez argues that practicing, repeatedly trying to build systems and applications, whilst trying to extend you skill set  is simply a matter of perseverance and habit.  That you must get yourself into the habit of practicing (coding for instance) on a regular basis (daily?), and that motivation and drive have little to do with it. I disagree with this.

In order to be able to commit and persevere with the practice you need some form of motivation, something to keep you going.  The simplest thing that motivates most people is greed.  Sounds dirty, but its true.  We all live at a level beyond necessity (materially speaking) so we need money to do this, we may not all strive for more more more, but living above the level of having food and shelter could be perceived as greed (I'm not saying we are all greedy, but we all like comfort and the nice things that are accepted as normal in modern living, and these all cost money.  So we all look to have an income, and as programmers/developers/coders writing code is a way of getting this.  So that is a base motivation achieved.  But how does that equate to practicing skills and getting better?  Most of us work for someone else, we have fairly clear objectives of what our employer needs us to deliver in order to maintain that employment and be paid.  This is often not enough to drive us to get better.  We can drift along, doing enough to get by without getting better.  10,000 hours of this will not get you very far.

So how do you get better?  What form will the 10,000 hours of practice take?  Well you could potentially use this employment time, if you use it wisely.  This is easy when you are starting out, all of your time will be spent on new things and so will be useful, but give it a year or so and your day-to-day work will stop stretching you.

10,000 hours equates to 1,250 8 hour days, or nearly 5 years of normal employment (8 hour days, 260 days per year).  So it is not a quick thing.  And if only about the 1st year will really stretch you and be useful practice then these 5 years will not actually amount to the 10,000 hours. So how do you build it up?

Side projects, personal learning, pushing your employer to embrace new ideas and technologies.  That is how.  If the project you are working on is stagnating, look for how it could be moved forward to the benefit of your employer and push for them to do it.  It will benefit you from a skills and proficiency perspective, and benefit them where they like it, in their wallet.

But for side projects and personal learning, the problem is often one of motivation, drive and time.  How do you drive yourself to put the time in?  You have just worked a 40 hour week for the man, where is the motivation to put in more time on top of this?  Yes if you put in the hard yards you will see a payback eventually, but 10,000 hours is a long time, and we are simple beasts, we want dividends now.  Something perceivable and measurable.  That is where the motivation aspect comes in.  That is the motivation.

You need some sort of short term perceivable and measurable metric of your progress and success.  Look for what it is in programming that you find most rewarding.  It could be a wider question than that, what do you find rewarding in life?  Personally I like the feeling of seeing a task completed.  The sense of satisfaction that something I set out to do happened and I succeeded in completing it.  I love hiking, and specifically hiking up mountains, and the greatest sense of achievement in this is to get to the summit.  But reaching a high summit can be a hard slog.  It might only take 5 hours rather than 10,000, but physically I still feel that fatigue in reaching my final goal en route.  What I do is to set intermediate goals along the way.  The next 3 miles, the next false summit, where I want to be before 11am.  Anything to give me a sense that I am doing well and on track for my final goal, the little pile of stones that marks the top.

In motivating myself to do some personal development it is the same.  I set short term goals that will get me to the big prize.  The big prize is the 10,000 hours mark?  No its becoming what you want to be personally.  Pinning what that is is difficult, and right now I can't easily express what that is, but I can set short term goals, and the final goal will come into sight at some point.

For side projects this short term goal setting is easy (although the side project itself should probably be one of your short term goals, but breaking this down further is a good idea) try to work in an Agile manner within the project.  It might be a personal project, with a team of 1, but breaking the development down into short iterations, with a goal of delivering a functioning system at the end of each iteration is a very valid approach still.

If you do this, and your psyche works anything like mine, then at the end of each iteration you will feel a sense of achievement and that will help you to motivate yourself for your next iteration.  You will surprise yourself by how easy it becomes to motivate yourself to complete the tasks of the iteration, because you will want that sense of achievement at the end of the iteration, and quickly the side project will take shape and maybe start to deliver on that base motivation, hard cash!  The great side benefit is that you will push yourself towards that 10,000 hours mark, which is a notional mark to indicate you are becoming a much better developer.

Motivation is important, its not just about turning the wheel, but you must find your own motivation by setting achievable milestones and rewarding yourself in some way that helps to keep you focused on the next step, the next step and eventually the big prize.

Monday, 15 June 2015

Can Adding an API Save Your System?

Creating an api as a publicly accessible interface to your system can actually make your system better than it currently is!

A bold claim I know, but bear with me and I will try to justify this claim. Lets begin by imagining a large system which has evolved over time into something your customers like. It fits the purpose, it earns you money, it continues to grow and evolve. All sounds well. Now look behind the curtain, in the box, under the surface. Those little duck legs are paddling like mad just to keep the serene appearance on the surface. Your system has evolved into something if a mess beneath the surface. You're not at fault, its a fact of any software systems that over time commercial pressures mean that technical debt accrues and the system architecture is corrupted into a mess. Often UI and business logic boundaries are blurred, code duplication becomes rife, maintainability is generally reduced.


A nice clean architecture would have clear separation between the layers of the system in terms of the responsibilities, but more importantly in terms of the code base.  In reality many systems blur these boundaries over time and code that should be in a business layer may be forced into the UI layer by time and commercial pressures.  For a system with one UI this does not surface as a problem, but consider adding a second UI, quickly the business rules that you think are robust and well tested are being violated.  How come? Well they were implemented in the previously sole UI, but are now being bypassed by the new UI.  This highlights the build up of technical debt that putting the code in the wrong place causes.  But as I say, you could live with this happily for years unless you introduce a new UI.

In a clean system the abstraction between layers should be such that any layer could be replaced an the system still function.  If there is an overlap in responsibilities between layers this is not so straightforward.

Given the evolution of the technological landscape to a much more mobile, flexible one, with the desire to access everything from everywhere, there is an obvious drive towards supporting multiple interfaces to a system to accommodate this.  Take a system that was written for a standard office of the past.  It may have a big thick client with maybe just a shared database behind, or a thickish client with a server side engine that does the grunt work and a central database.  To evolve either of these systems a web front end may be produced utilizing the same data.  Where a server side engine existed this may be reused for consistency of functionality and minimal effort to create the new UI.  If however any of the business logic existed in the client this will need to be replicated in the new web service.  If we extend further and add mobile applications the logic will need to be placed in these too.  And what about integrations with third party systems?  Where does the logic sit there?  We need to contain all the logic in a common business layer, just as our clean system architecture planned.

This is a problem I have seen many times over the years, and often when creating this one new UI the decision was taken to do the 'easy' thing at the time and duplicate the logic.  Often this resulted in the logic being implemented inconsistently in the new UI.  And worse, any bug found in either flavour of the system would only be fixed in that one flavour.

Recently I have been working on the addition of a rich RESTful API for a mature system, and where we find a hole in the business logic due to the API bypassing all UI layers the decision has been taken to do the right thing.  Move the business logic into the business logic layer so all UIs have the same logic implemented by the common layer below.

All this sounds like a lot of bad coding has happened in the past, and that bad decisions have been made as to where to put code logic.  But this is not the case in reality.  Image a form in a system that allows you to enter data.  A numeric field is entered, and the form restricts the format of the data.  E.g. non negative, with enforced bounds and precision.  The business layer of the system may well be the place that all the data validation is being performed, but what if some of the boundary conditions that should be guarded against are missed when writing this validation code?  No-one made the decision to miss this validation.  The testers thought of the boundary cases and tested them.  The system held up robustly as the UI did not allow the user to enter the invalid data.  But if the UI had not enforced these restriction then the invalid data may have gotten through.  There was no way to test this.  We thought the system was robust, and it was, but only via the single UI that was available to the testers to explore/exploit the system.

If in the scenario of the ever evolving technological landscape above we add a second UI, for whatever reason these restrictions may not be possible and the system becomes just that bit more fragile.

With an API, we can decide to implement no restrictions (other than type) on the data input and thus force the (common) business layer to take the responsibility for all the data validation.

The decision made to do this on the system I am currently writing the API for means that the API will be a little slower to produce, but more importantly the overall system will end up in a much better state of technical health.  And the biggest benefit from this is that if a new UI is needed in the future that maybe does not even use the API but communicates directly with the business layer, we can be confident that the logic will be intact and robust.

So the addition of an API will not directly save your system, but can give you confidence that the system is fit and healthy enough to evolve further into a rapidly changing world that may put ever more challenging requirements on the core of the system.

Tuesday, 2 June 2015

OAuth in Winforms

The junior dev I am mentoring at my job was recently given the task of extending his knowledge of APIs and asked to demonstrate his newly gained knowledge by producing an application that consumes a third party API. More specifically a RESTful API.

In itself this does not seem the most taxing of tasks, but bear in mind that the junior dev has no web development experience, his only dev exposure in his current role has been on a winforms application. So to make this a targeted task, aimed at learning about RESTful APIs, it was decided a simple winforms application using the 4 main verbs would demonstrate sufficient understanding.

This however did raise a question, how to interact with an OAuth provider from a winforms application.  This should be a simple matter, but it is something that is not well documented, especially in the documentation of most of the more famous APIs.  There are plenty of tutorials for how to authenticate with an OAuth provider from a web site, and most of the APIs the junior dev looked at provided their own OAuth.

The final choice of the API to consume was Instagram, which provides great documentation for its OAuth when being consumed in a web site, but nothing for Winforms.  This is not surprising, Winforms is an old technology, not something that you would expect to be used with a service like Intstagram, but why not?  It should be possible (and is). But it is understandable that Instagram have not invested time in providing detailed documentation on how to do this.  So here we go on how it was accomplished:

Firstly, the method of validating the user's claim of access to Instagram is via a web page hosted by Instagram.  The documentation states
which is fairly straightforward in a web app, but how do you do this in a winform application?

The answer is to host a web browser control within your application which will display the url above and be redirected upon completion of the authorization process.  We found some code with a quick trawl of the search engines to perform this action in a pop up window:

 string authorizationCode = StartTaskAsSTAThread(() => RunWebBrowserFormAndGetCode()).Result;
                 
           private static Task<T> StartTaskAsSTAThread<T>(Func<T> taskFunc)  
           {  
                TaskCompletionSource<T> tcs = new TaskCompletionSource<T>();  
                Thread thread = new Thread(() =>  
                {  
                     try  
                     {  
                          tcs.SetResult(taskFunc());  
                     }  
                     catch (Exception e)  
                     {  
                          tcs.SetException(e);  
                     }  
                });  
                thread.SetApartmentState(ApartmentState.STA);  
                thread.Start();  
                return tcs.Task;  
           }  
           private static string RunWebBrowserFormAndGetCode()  
           {  
                Form webBrowserForm = new Form();  
                WebBrowser webBrowser = new WebBrowser();  
                webBrowser.Dock = DockStyle.Fill;  
                var uri = new Uri(@"https://api.instagram.com/oauth/authorize/?client_id=CLIENT_ID&redirect_uri=REDIRECT_URI&response_type=code");  
                webBrowser.Url = uri;  
                webBrowserForm.Controls.Add(webBrowser);  
                string code = null;  
                WebBrowserDocumentCompletedEventHandler documentCompletedHandler = (s, e1) =>  
                {  
                     string[] parts = webBrowser.Url.Query.Split(new char[] { '?', '&' });  
                     foreach (string part in parts)  
                     {  
                          if (part.StartsWith("code="))  
                          {  
                               code = part.Split('=')[1];  
                               webBrowserForm.Close();  
                          }  
                          else if (part.StartsWith("error="))  
                          {  
                               Debug.WriteLine("error");  
                          }  
                     }  
                };  
                webBrowser.DocumentCompleted += documentCompletedHandler;                 
                Application.Run(webBrowserForm);  
                webBrowser.DocumentCompleted -= documentCompletedHandler;  
                return code;  
           }  
which gets you the code included in the redirect URL.  The CLIENT_ID you need to get from Instagram, register an application with them and it will be provided, and the REDIRECT_URL must match, but the location is unimportant, as the web browser will close on completion it will not be seen.

There is still one problem, when using Fiddler to inspect the successful API calls from the test bed of Apigee the access token has three parts period delimited, the user_id, an unknown part, and the code returned from the OAuth authentication stage.  This is not well documented, and at this stage we are unable to generate the full access token.

All this highlights that the documentation of even well established APIs can at times be lacking for non-standard development paths.